Everyday it seems like I find a story or two from a cities local online newspaper which delves into the topic of blogging and what it’s all about. The story usually goes through a mini backlog of history surrounding the term, what blogging is and at the end of the article, there is usually a list of suggestions on how to get started with the most popular suggestion being WordPress.com. Using WordPress.com is a great way to introduce yourself to blogging but if you decide that you want to turn blogging into a full time job or just want more control over your work, you’ll need to move. Thankfully, the move from WordPress.com to WordPress.org (WordPress.org being the self hosted version of WordPress) is painless thanks in large part to a great export tool. Once you have that file on your desktop, you can breath a little easier considering your half way through the content migration process. The second part of this guide refers to an installation of WordPress 2.7. Login to your self installed WordPress administration panel and from the menu on the left click on TOOLS - IMPORT. From the list of blogging systems click on WordPress. Next, click on the Browse button and locate the XML file you downloaded earlier. This will upload the XML file into your WordPress installation and will unpack all of the data the file contains. There is one caveat though regarding this entire technique. ; Maximum allowed size for uploaded files. Apparently, the php.ini file overwrote the settings on the original file and I was able to bump my limit up to 7 Megabytes. This trick is not guaranteed to work. As a last ditch effort, you can also try adding these lines to your .htaccess file. Just replace the pound sign with a number that is above the size of your WXR file. #set max upload file size #set max post size Once the WXR file is unpacked on your self installed version of WordPress, you’re ready to walk through the gates of freedom without skipping a beat! P.S. This strategy also works for those wanting to go from WordPress.org to WordPress.com. Moving a Blog from WordPress.com to WordPress.org is something I’ve had a lot of questions about - today Jeff Chandler shares tips on hwo to do it.
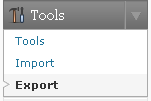 To start things off, login to your WordPress.com account and browse to your administration panel. From the menu on the left, click on TOOLS - EXPORT. At this point, you have the option to confine the export to a particular author or all authors. Using the export tool will compile yourposts, pages, comments, custom fields, categories, and tags. This information is placed into a WXR file or, WordPress eXtended RSS file. Essentially, this file is just a normal XML RSS based file with a couple of custom fields added to it which makes it specific to WordPress. Once you’re finished, click on theDownload Export File button and save it to your desktop.
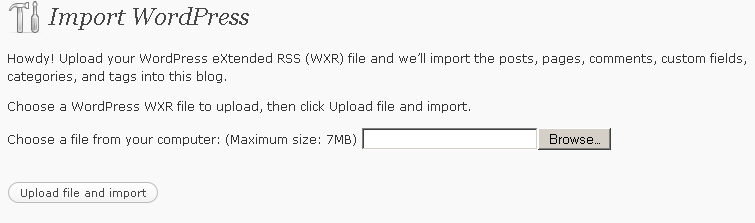 Most webhosts for whatever reason still have their PHP.ini configured in such a way where end users can only upload files with a maximum file size of 2MBor smaller. Although it takes quite a bit of content in an WXR file to go over 2MB, 2MB is not a lot of head room. If you find yourself in the position where your WXR file is larger than the maximum file size, I highly suggest submitting a trouble ticket to your webhost and asking them to increase the limit. If they choose not to, then ask them if they can import the file for you. If that doesn’t work, you can pull a trick from your sleeve by uploading a custom php.ini file to your webhosting accounts root folder. This is what my host did for me and afterwards, I took a look at the php.ini file and noticed it had this line in it:
upload_max_filesize = 7M
php_value upload_max_filesize #M
php_value post_max_size #M
Jan 2, 2009
CLIP: How To - Move From WordPress.com To WordPress.org
Nov 19, 2008
Install tEarn on the Open Source Drupal CMS
 Copy Tag from tEarn
- Create a tEarn Account
- Setup your Publisher Profile. Reference the FAQ for advanced settings.
- Copy your Tag to the Clipboard. See step 3 on the page.
- Select Blocks Under Site Building
- Select a Footer block and click configure
- On the toolbar, select HTML
- Paste your Tag from the Clipboard and Update
- Click Save Block
Nov 11, 2008
One-Click Blogger Install of tEarn Widget

We've simplified the installation of tEarn exitmercial for Blogger.


Nov 1, 2008
Installing tEarn on WordPress 1.x/2.x
Note: The following instructions are not for use with blogs hosted at WordPress.com or any WordPress MU–powered installation.
tEarn's exitmercial services are delivered at your site via the tEarn script. Once you’ve installed tEarn code on your site, you can control the tEarn service from your tEarn Control Panel. The code connects tEarn and your WordPress, so adding exitmercials to your blog couldn’t be easier!
To add tEarn to a WordPress-powered blog, you’ll need to insert a small piece of code in your templates. Fortunately, this is easy — follow these steps.
Create an account at tEarn for your blog and copy your tEarn code.
Sign in to your WordPress Admin dashboard.
Click the Presentation tab, then the Theme Editor sub-tab. You should see a dropdown menu of installed themes and a list of template files associated with the currently selected theme to the right of the editor. The remainder of this example assumes use of the WordPress Default theme.

Click Main Index Template in the list of template files. Its contents load in the editor. (For WordPress 1.5: “Main Template”)
Paste the code you copied in step 1 in the body of the template. We recommend the line following the BODY tag. It can also be inserted before the closing BODY tag.
Click Update File » to save your changes.
The tEarn tag has no visible parts on your page. Click on links that exit your blog to test. Use your tEarn Control Panel to monitor results.
Oct 16, 2008
tEarn Exitmercial One-Time Special
Oct 8, 2008
Installing tEarn Exitmerical on Tumblr
Tumblr is the simplest blogging tool. It supports PC's, Mac's, SMS phones, IM clients - allowing you to easily post to your blog from anywhere.
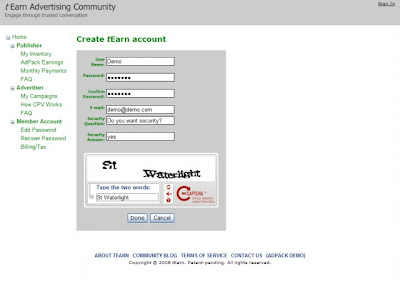
- Create a tEarn Account
- Setup your Publisher Profile. Reference the FAQ for advanced settings.
- Copy your Tag to the Clipboard. See step 3 on the page.
- Login to Tumblr and find your Dashboard
- Click customize. Toolbars at the top show options
- Click Theme and paste your tag after the HEAD tag.
Sep 29, 2008
tEarn Exitmerical - $20 Trial Buy, the Simplest Ad Buy, PPT
Publishers: To install this presentation on your ad page, the last page of the presentation has the needed HTML tag. Here is the link to the '$200 Special' presentation.
Sep 26, 2008
Installing tEarn into Dreamweaver Templates, Adobe
How to Modify & Update a Dreamweaver Template?
So you have made the template and the pages using it. How do you modify the common elements of your template pages? All you need to do is make your changes to the dreamweaver template and save it. All pages are automatically updated on request. Simple!

Tip: Use Server Side Includes in your Dreamweaver Template
We highly recommend the use of Server Side Includes (SSI) with dreamweaver templates for large websites. Include files save you the trouble of updating and uploading numerous pages having the same content. For example in your dreamweaver web site if you navigation links are in an include file you can change your navigation at any time and will have to upload only that single include file. Read our free tutorial on SSI.
- Create a tEarn Account
- Setup your Publisher Profile. Reference the FAQ for advanced settings.
- Copy your Tag to the Clipboard. See step 3 on the page.
- Open your master template. (If you have more than one, repeat these steps for each template)
- Make sure the template is in the CODE mode for pasting HTML code.
- Place your data cursor on any fixed part of the master template. This includes the header, sidebar, or footer. Since the tEarn code has no visible footprint, the code can be inserted in any part of the template, including the HEAD part of the template.
- Paste your Tag from the Clipboard and Save
Sep 23, 2008
Sep 22, 2008
General Instructions for CMS Install of tEarn Tags
The tEarn Javascript code adheres to well-behaved, web 2.0 standards. Similar to Google Analytics, our asynchronous, multi-threaded, and failsafe design assures no user, bandwidth, or server impact. The code works quietly and is compatible - even when dozens of third-party Javascript widgets share the page.
Here are the general instructions to copy your tEarn tag and paste into a Content Management System (CMS).
For step-by-step instructions for your CMS system, search 'install Google Analytics and your CMS name'. The tEarn code is installed the same way as Google Analytics.
- Create a tEarn Account.
- Setup your Publisher Profile. Reference the FAQ for advanced settings.
- Copy your Tag to the Clipboard. See step 3 on the page.
- Login to the Admin section of your CMS.
- Look for the 'Header HTML' or 'Footer HTML' settings for your website. Each CMS may use different names to refer to these settings. Early systems may use the term SSI for Server Side Include. AspDotNet refers to this page as a Master Template. Other terms include theme, layout, or website settings. These components control panels that are common to evey page of a website, like the header, footer, or sidebar.
- Select the command. Choose the HTML or source option, if offered.
- Paste your Tag from the Clipboard and Save changes.
To join the tEarn CMS network, install this tag at the bottom of the post.
Sep 16, 2008
Step-by-Step tEarn Install on Google's Blogger
Here are the step-by-step instructions to copy your tEarn tag and paste into Blogger.
- Create a tEarn Account
- Setup your Publisher Profile. Reference the FAQ for advanced settings.
- Copy your Tag to the Clipboard. See step 3 on the page.
- Login to Blogger
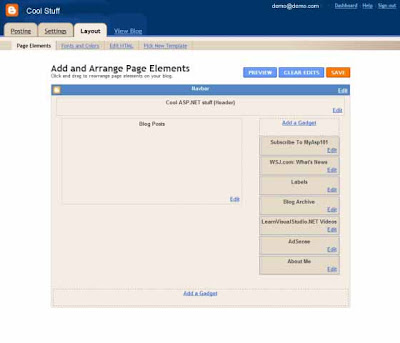
- Click Customize at the top-right of your blog page; or the Layout tab from your Dashboard
- Click 'Add a Gadget'. It's a link. Add the tag as a sidebar, footer, or body gadget.
- In the pop-up window, scroll down and choose the 'HTML/Javascript' gadget.
- Paste your Tag from the Clipboard and Save
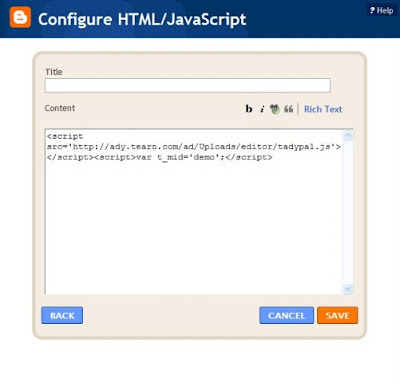
Sep 7, 2008
Learning the Core of HTML
 Anyone can learn HTML.
- Uploading the source file
- Copy the URL or address
- Paste into your document
- If you're linking another website, skip this step. It's already uploaded.
- If you're linking a previously published page, skip this step.
- If you're linking an ad service, skip this step.
- If you're linking a photo, upload to a server like Yahoo's FlickR, Google's Picasa, or Facebook Photos, or hundreds of public servers.
- If you're linking a video, upload to Google's Youtube, Yahoo's FlickR, or any number of 3rd party services.
- If you're linking media from public sources, find the item and skip this step.
- You can use Google, Yahoo, or Microsoft Live to search for pages, images, or video. Click to follow a link and the address is available in the address box for copying.
- Using PC browsers, the right-click menu allows you to point to a link copy it's address.
- Pointing to a photo, you can right-click to get the address of the photo. Note the confusion between the address of the photo versus the address of the page that contains the photo. Copy the address that match your need.
- Youtube has a special feature that provides the HTML tags needed to embed a video on a page. Click and copy to the clipboard.
- Ad services also provide HTML tags. Find the tag and copy.
- Using a graphical interface like a blog, iconic tools allow embedding of links, images, and HTML. Select the item you need and paste the clipboard address into the right box.
Here is a breakdown of the parts.http://www.blogger.com/post-create.g?blogID=8964xxxxx006013
- The http:// is a protocol for hypertext transfer. Other protocols are used on the Internet to transfer mail, voice, and other services.
- The www.blogger.com is a domain name. This is the unique name for a server on the Internet.
- The /post-create.g part is a path through the server to a file on the server.
- The ?blogID=... is a query string used by the program on the server.
<a href="http://www.blogger.com/post-create.g?blogID=8964xxxx06013">Sample</a>
- Angle brackets signal HTML code instructions in a page.
- The longest, most complex part of a link is the address.
- 'Sample' is the hypertext'd phrase.
- The 'a' tag starts the link. The '/a' tag ends the link.
<img src="http://upload.wikimedia.org/...HTML.svg/150px-HTML.svg.png" />

 "
" Facebook
 LinkedIn
 about adEcon
 MarSP
MarSP rich media
 top
top blog
blog newspaper
 social network